Orange Carrot Loaf

20230730_165552

How are you guys doing?
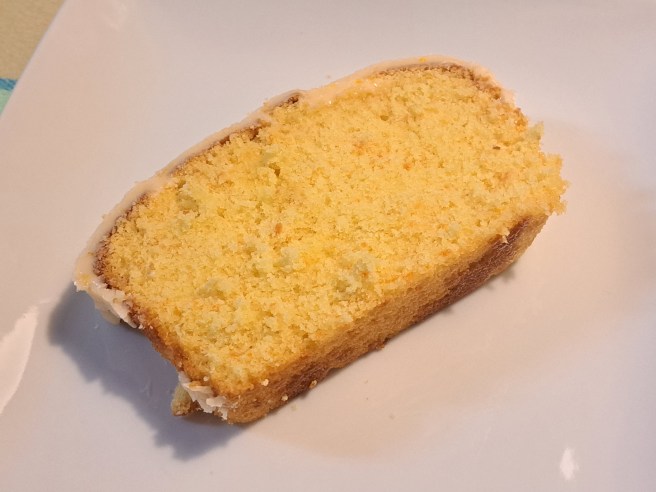
Today we brought you guys a loaf, a “bread”, a cake. Call it whatever you want. What matters is that it’s delicious.

You’re gonna need:
-Microwave
-Oven
-Zester
-Food scale
-Food processor
-Bowls
-Silicone spatula

Ingredients for the loaf:
-3/4 cup orange juice (no sugar added)
-3.5oz (100g) carrots, chopped
-3 eggs
-1 1/2 cup granulated sugar
-1 1/4 tsp naval orange zest (about an orange)
-1/2 tsp orange extract
-1/3 cup unsalted butter, at room temperature
-2 cups all-purpose flour
-1/4 tsp salt
-1 1/2 tsp baking powder

Instructions for the loaf:
-Pre-heat the oven to 340°F. Line a 9x5x2.5 inch loaf pan (about 8×4 bottom) with foil, covering the sides as well.
-In a bowl, combine the flour, salt, and baking powder. Set aside.
-In the food processor on high, beat the carrots until it’s as ground as possible. That will take a couple of minutes, and make sure to scrape the sides and beat it again to avoid any big pieces being left behind. We suggest alternating between high and pulse here, as the speed change might help getting any stubborn pieces.
-Add in the butter, and beat the mix for a minute or so, until you get a cream.
-With the food processor on low, add in the sugar and the zest, beating again for a minute or two. Scrape the sides.
-With the food processor on low, add in the eggs, one by one. Beat the whole thing again for about two minutes. Add in the juice and the extract, and beat this for a couple of seconds to incorporate.
-With the food processor still on low (last time we’re gonna say this here, promise), gradually add in the dry mix. Beat this only enough to get everything incorporated. If you want to make absolute sure that there are no “unprocessed” surprises on the bottom of the food processor, pour your batter into a bowl and stir it with a silicone spatula before pouring it into the prepared loaf pan.
-Bake your loaf for about 65 minutes, or until it passes the toothpick test. Let it cool down to room temperature before working on the icing.

Ingredients for the icing:
-4 cups powdered sugar
-50g orange juice (no sugar added)
-50g sweetened condensed milk
-Zest of one naval orange
-A few drops of food coloring (orange or yellow), if desired

Instructions for the icing:
-In a microwave-proof bowl, combine the sugar, sweetened condensed milk, and juice. Microwave this for 30 seconds. Stir, add the food coloring drops if you want to, and microwave it for another 30 seconds. If your icing is soft and runny, that means it’s good to go. If it’s not, microwave it for another 30 seconds. This might take several times, just make sure that you do not microwave it for longer than 30 seconds each time you check.
-After your icing is smooth and runny, stir in the zest with a spatula. Pour your icing over your (already out of the baking pan) loaf. Let your icing sit for a couple of hours to dry.

And that’s it!
See you guys soon! In the meantime, don’t forget to follow us on Instagram!

Easy Meatloaf

How are you guys doing?
Today we have no picture. The truth is that the concept of “basic/easy meatloaf” isn’t very picturesque. HOWEVER, it tastes good, so do not ignore this one. Whenever we have a good AND honest picture of our meatloaf, we will post it here. Promise.

With that being said, let’s make some meatloaf.

You’re gonna need:
-Oven
-Bowl
-Foil
-Spatula
-Loaf pan (9x5x2.5 inches tall)

Ingredients:
-1/2 packet of beefy onion soup powder (about 2 Tbsp)
-1lb ground beef
-6 Tbsp plain bread crumbs
-1 egg
-6 Tbsp water
-8 tsp ketchup

Instructions:
-Pre-heat the oven to 350°F. Line your loaf pan with foil. Don’t forget to cover the sides.
-In a bowl, combine all the ingredients. Put your loaf into the loaf pan, and bake it uncovered for about 55 minutes. If you are not sure your loaf is done, make a cut with a knife right in the middle of it. If your loaf is not pink anymore, that means it’s done.

That’s it!
See you guys soon! And don’t forget to follow us on Instagram!

Lemon Sugar Cookies With Cream Cheese Chips

20230719_115838

How are you guys doing?
Today we are bringing you guys a recipe for a sugar cookie.

Trivia time: do you know the difference between a sugar cookie and a “normal” cookie?
Sugar cookies don’t have brown sugar.

Anyways, back to the recipe. Plan this one ahead of time, because as with most cookies we have here, it’s ideal that you let the batter rest overnight.

With that in mind, let’s get to it.

You’re gonna need:
-Zester
-Oven
-Mixer
-Refrigerator
-Bowls
-Cookie scoop (2 Tbsp in size)

Ingredients:
-3/4 cup granulated sugar
-Zest of 1 lemon
-1/2 cup unsalted butter, at room temperature
-2 tsp lemon extract
-1 Tbps lemon juice
-1 large egg
-2 cups all-purpose flour
-1/2 tsp salt
-1/2 tsp baking soda
-1/4 tsp baking powder
-4 oz cream cheese chips (or white chocolate, if you can’t find them)

Instructions:
-In a bowl, combine the flour, salt, baking powder, and baking soda. Set aside
-In the mixing bowl, beat sugar, butter, zest, juice, and extract for a couple of minutes. With the mixer on low, add in the egg, beating again for a couple more minutes, until creamy. Don’t forget to scrape the sides halfway through.
-With the mixer still on low, gradually add in the dry mix, beating just enough so everything is combined. Turn off the mixer, scrape the sides with a spatula, and stir in the cream cheese chocolate chips.
-With the 2 Tbsp scoop, make little balls and set them in a container. Do not stack them up. Close the container (as you normally would, just making sure here…) and let them sit overnight in the refrigerator.
-Pre-heat your oven to 340°F. Set your cookies on a baking sheet covered with foil. Make sure there are at least 2 inches of a gap between them. Bake your cookies for about 13-15 minutes, or until the edges are (very) slightly tan.

That’s it!
See you guys soon! Until then, don’t forget to check out our Instagram!
Bye!

Banana Coffee Cake

20230715_145437

How are you guys doing today?

Do you like bananas? Do you like an easy recipe that takes WAY less effort than what it looks like?
If so, this is your recipe.
You’re gonna need:
-Food processor
-Oven
-9x9x2 square pan + foil (we highly recommend foil for this one as opposed to greasing with butter and flour)
-Bowls
-Refrigerator
Ingredients:
For the crumb topping:
-1 cup all-purpose flour
-1/2 cup brown sugar
-1/4 cup granulated sugar
-1/2 tsp cinnamon
-1/4 tsp salt
-1/2 cup unsalted, cold butter, cut into pieces (we just cut them into Tbsp sizes)
For the cake:
-1/2 cup unsalted butter, at room temperature
-1 cup granulated sugar
-1 large egg
-8oz (225g) banana, ripe, cut into pieces
-1 tsp banana extract
-2 cups all-purpose flour
-1 tsp baking powder
-1/4 tsp baking soda
-1/2 tsp salt
-1/2 tsp cinnamon
-3/4 cup buttermilk
For the glaze:
-1/4 cup confectioners sugar
-1 Tbsp heavy cream
Instructions:
For the crumb topping:
-In the food processor, add flour. sugars, cinnamon, and salt. Pulse for a couple of seconds to make sure it’s well combined.
-With the food processor on low now, add in the pieces of butter, one by one. If needed, change the speed/use the pulse button to make everything crumbly. it won’t take long, probably around 10 seconds.
-Put your crumbs in a container and let them sit in the refrigerator while you proceed with the rest of the recipe.
For the cake:
-Pre-heat the oven to 340°F. Line your baking pan with foil, making sure that all sides are covered.
-In a bowl, combine all-purpose flour, baking powder, baking soda, salt, and cinnamon. Set aside.
-In the food processor, beat the butter, the banana extract, and sugar for a minute. After it gets creamy, add in the egg, and beat this mix for another minute or so. Next, add in the banana slices, and beat this until all of the banana pieces are gone and you just have this creamy buttery mix.
-With the food processor on low,  add in the buttermilk. It’s only gonna take about half a minute to get this combined. Next, with your food processor still on low, gradually add in the flour mixture, beating only enough to make everything combined. If you want to be absolutely sure that everything is smooth, we recommend you pour your batter into a bowl before pouring it into the baking pan. This batter usually doesn’t give us any “bottom of the food processor” problems, though.
-Grab the refrigerated crumbs and cover the top of your cake evenly. To some of you, it may look like a lot of crumbs, but trust us, it’s the right amount.
-Bake it for about 55 – 58 minutes, or until it passes the toothpick test. Remember, each oven is different, so keep an eye on your cake.
For the glaze:
Combine the ingredients with a spoon or a fork. Stir it for half a minute, and it should be smooth and ready to be used. We like to decorate using a confectioners bag, but that’s just us.
Alright, that’s all for today!
See you guys soon! And don’t forget to follow us on Instagram!

Soft Batch Banana Oatmeal Chocolate Chip Cookies

20230707_183710

How are you guys doing?
Today we are bringing you guys a soft oatmeal cookie. If you only like chewy oatmeal cookies, skip this one. One more thing: this recipe has to rest overnight, so plan ahead!
That being said, let’s get to it.

You’re gonna need:
-Baking sheets
-Foil
-Oven
-Food processor
-Bowls
-Spatulas
-2 Tbsp Cookie Scoop

Ingredients:
-1 1/2 cup all-purpose flour
-1 cup granulated sugar
-1 tsp salt
-1 1/2 tsp baking soda
-1 tsp cinnamon
-1/2 tsp nutmeg
-1/4 tsp ground cloves
-3/4 cup unsalted butter
-1 large egg
-225g (about 8oz) bananas
-2 cups quick oats
-1 cup dark chocolate chips
-1 cup chopped walnuts
-1/2 tsp banana extract (optional)

Instructions:
-In a bowl, combine flour, salt, baking soda, nutmeg, cinnamon, and cloves
-In a food processor, beat the butter, sugar, egg, banana, and extract, if you are using it. Beat this for about 2 minutes, or until you get a very smooth cream.
-With the food processor on slow, gradually add in the dry mix, beating just enough to combine.
-Pour this batter into a big bowl, and stir in the quick oats with a spatula. Make sure it’s well combined before you proceed with adding the walnuts, and the same goes for the chocolate.
-Let your dough sit in the refrigerator for at least 5 hours before continuing this recipe.
-With a 2 Tbsp scoop, make balls with your now refrigerated dough and let them rest for at least 12 more hours. Don’t stack them up.
-Bake your cookies in a preheated oven at 340°F for about 15 minutes. Remember that each oven works differently, and if your cookies are not the same size as ours, they will definitely bake at different times. That being said, keep an eye on them. If they start to tan on top, it’s time to get them out of the oven.
-Store them at room temperature, in an airtight container.

That’s all for today!
Don’t forget to follow us on Instagram!
See you guys again soon!

Carrot Cake Cookies

20230702_154739

How are you guys doing?

Today we have carrot cake, cookie version!
By the way, these cookies are cakey. Do not expect a crunchy cookie with this one.

Let’s get to it.

You’re gonna need:
-Food processor
-Cookie scoop (1Tbsp)
-Oven
-Bowls
-Baking sheet
-Foil

Ingredients:
-170g (6oz) carrots, chopped
-1 1/2 cups all-purpose flour
-1 tsp baking soda
-3/4 tsp salt
-1 tsp ground cinnamon
-1/2 tsp ground nutmeg
-1/2 cup unsalted butter
-1/2 cup granulated sugar
-1/2 cup brown sugar, packed
-1 large egg
-1 tsp vanilla extract
-1 cup rolled oats
-3/4 cup pecans (or walnuts)
-1/2 cup raisins

Instructions:
(This cookie has to sit overnight in the refrigerator, so plan ahead!)
-Combine flour, baking soda, salt, ground cinnamon, and nutmeg in a bowl. Set aside.
-In the food processor, beat the carrots with the butter for a couple of minutes, until the carrots are basically ground. Add in the egg and the vanilla extract and beat for another couple of minutes, until creamy. Next, do the same thing with both sugars.
-With the food processor on low, gradually add in the dry mix. Beat just enough to combine.
-Pour the dough into a big bowl, and add in the oats. Combine stirring with a spatula. Do the same thing with the nuts and raisins.
-Let your dough sit overnight in the refrigerator. We suggest a rest of at least 20 hours.
-Use a cookie scoop to make your cookies (we use 1Tbsp size for this one). Bake them at 340°F, on a baking sheet lined with foil, for 13 minutes. Obviously, if you change the size of the cookies, they will be done at a different time.

Alright, that’s it for now! Don’t forget to follow us on Instagram!
See you guys next time!

Pumpkin Carrot Snack Cake

20230626_190613

How are you guys doing today?

It’s not fall yet, but we got one of our pumpkin puree cans and made this delicious cake.

Let’s get to it.

You’re gonna need:
-Oven
-Food processor
-9x9x2 inch square baking pan

Ingredients:
-1 3/4 cup all-purpose flour
-1 tsp baking soda
-1/2 tsp baking powder
-1/2 tsp salt
-1 tsp ground cinnamon
-1/8 tsp ground nutmeg
-1/2 tsp ground ginger
-1/4 tsp pumpkin pie spice
-1/2 cup canola oil
-1/2 cup brown sugar
-6 Tbsp granulated sugar
-1 Tbsp honey
-1/2 cup sour cream
-1/2 tsp vanilla extract
-3oz/85g carrots (chopped)
-1/2 cup pumpkin puree
-2 large eggs

Instructions:
-Pre-heat the oven to 340ºF. Line your baking pan with foil or grease it and dust it with flour. We used foil.
-In a bowl, combine flour, baking soda, baking powder, salt, cinnamon, nutmeg, ginger, and pumpkin pie spice. Set aside.
-In the food processor, beat the sugars, oil, eggs, and extract for a couple of minutes. Add in the carrots and the pumpkin puree and beat for another 2 to 3 minutes, until everything is creamy and smooth. Don’t forget to scrape the sides. Add in honey and sour cream, and beat it again for another minute.
-With the food processor on, gradually add in the dry mix, beating just enough to combine. After that, pour the batter into a bowl and stir with a spatula to make sure no little bits were forgotten on the bottom of the food processor.
-Pour the batter into the prepared pan and bake it for about 29 minutes, or until it passes the toothpick test. As we always say, trust the toothpick more than you trust the time, as your oven might be different from ours, a different baking pan could affect the baking time, and even different brands of ingredients could possibly do that as well.

That’s it!
We’ll see you guys again soon!

And don’t forget to follow us on Instagram

Applesauce snack cake

20230625_122344

How are you guys doing?
Today we are bringing you guys a super soft applesauce cake. Let’s get to it.

You’re gonna need:
-Food processor
-Oven
-9x9x2 square baking pan
-Two bowls

Ingredients:
-1 1/2 cup all-purpose flour
-1/2 Tbsp baking powder
-1 tsp baking soda
-1/4 tsp salt
-1 1/4 tsp ground cinnamon
-1/2 tsp ground nutmeg
-1/4 tsp ground cloves
-3/4 cup granulated sugar
-1/4 cup dark brown sugar
-1 1/4 cup unsweetened applesauce
-1/2 cup vegetable oil
-2 eggs
-1/2 tsp apple emulsion (optional)

Instructions:
-Pre-heat the oven to 340ºF. Line the baking pan with foil or grease it and dust it with flour. We use foil for this one. Set aside.
-In a bowl, combine flour, baking powder, baking soda, salt, cinnamon, nutmeg, and cloves. Set aside.
-In the food processor, beat the eggs with both sugars for a couple of minutes. After that, add in the applesauce, the extract, and the oil. Beat the whole thing for a minute or two.
-With the food processor on, gradually add in the dry ingredients. Beat it just enough to combine everything.
-To make sure that everything is well combined, pour your batter into a bowl and stir it with a spatula. After that, immediately pour it into the baking pan.
-Bake it for about 28 minutes or until it passes the toothpick test. We never recommend to just trust the time we give you guys, as each oven is different, and even your baking pan could make a difference. That being said, trust the toothpick.

Alright, that’s it!
See you guys soon! In the meantime, follow us on Instagram!

Sweet cornbread

20230622_133101

How are you guys doing?
Today we are bringing to you guys a recipe for sweet cornbread. This recipe calls for unexpected ingredients, but fear not, it tastes really good. Just a reminder, this cornbread is almost like a cake – it is sweet. Also, since it’s very moist, you should store it in the refrigerator.

What you’re gonna need:
-Oven
-9x9x2 square baking pan
-Food processor
-Bowl

Ingredients:
-2/3 cup coconut milk
-3 eggs
-160g granulated sugar
-170g unsalted canned corn (drained)
-1 cup flocão (you can find this ingredient at Brazilian stores – no, there is no substitute for this)
-3/4 cup vegetable oil
-2 tsp baking powder
-160g shredded mozzarella

Instructions:
-Pre-heat the oven to 340ºF. Line your baking pan with aluminum foil or grease it and dust it. We use foil for this recipe. Set aside.
-In the food processor, beat the coconut milk, the eggs, and the sugar for a couple of minutes.
-With the food processor still on, gradually add the corn. Do the same thing with flocão, followed by the cheese. Add the baking powder and beat your batter for a couple of seconds afterward.
-Next, pour your batter into a bowl, and manually stir it with a spoon or spatula, just to make sure the baking powder is well combined. With that done, pour your batter into the prepared baking pan.
-Bake it for about 36 minutes, or until it passes the toothpick test.

That’s it! As previously said, store this cornbread in the refrigerator.

See you guys next time!
Instagram

Guava snack cake

20230318_140110

How are you all doing?
Today we are bringing you guys a guava cake. Not filled with guava, but actually MADE with guava.

Let’s do this.

You’re gonna need:
-Stand mixer + bowl
-Microwave
-Oven
-9x9x1.5 (or taller) baking pan
-1 extra bowl

Ingredients:
-1/2 cup of unsalted butter, at room temperature.
-1 cup granulated sugar
-1/2 cup guava paste
-1/2 cup sour cream
-1/4 tsp baking soda
-1 1/2 cup all-purpose flour
-3 large eggs

Instructions:
-Pre-heat the oven to 325°F.
-Line your baking pan with foil or grease it and dust it with flour. We use foil here.
-In a bowl, combine flour and baking soda. Set aside.
-In the mixer, beat the butter with the sugar until creamy.
-In the meantime, start melting your guava. You’ll have to do this FAST because guava paste goes back to its consistency within a minute or maybe even less. Grab a bowl, put enough guava paste to be either 1/2 cup or more (you do not want to do this process twice, so better to have more than necessary than less here), melt it in the microwave for 30 seconds, and stir a bit, another 30 seconds, stir, and maybe you’ll have to do this once or twice more. You’re looking for a “lava”, bubbly guava paste. As soon as you get this done, measure it to get exactly 1/2 a cup, and add this to your mixer, which is STILL ON, CREAMING THE BUTTER. Beat this for a minute or so, then continue.
(alright, the danger is over now, let’s calm down now, breathe, and follow the rest of the recipe)
-Add in the eggs, one by one, beating for a bit after each addition. Add in the sour cream. Keep beating.
-Add in the flour, gradually, beating only enough to combine everything. Don’t forget to scrape the sides.
-Pour your batter into the prepared pan, and bake it until it passes the toothpick test. It’s on the 38-minute mark for us but remember: each oven is different, so keep an eye on it.

That’s it! This cake is absolutely delicious by itself, but feel free to have it with some coffee 😉

See you guys soon!

Oh, by the way, we have an Instagram page now!